Walkthrough :: Developing a WPF application with WebBrowser
This walkthrough will illustrate the creation of a WPF application with Visual Studio that uses the WebBrowser control and provides printing to any page navigated to. Advanced features of ScriptX are used to provide accurate control of the print and so a license is required.
Before starting ensure that you have ScriptX installed on the development PC.
Also, contact us to request an evaluation license for applications. You will need to provide the following detail:
- Your company name
- The product name for your application
We will then provide a 30 day evaluation license.
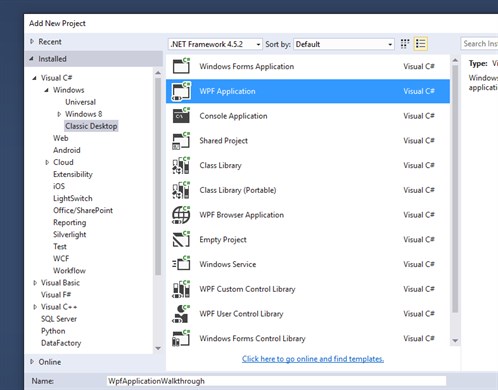
1. Create the project
Create the project in the usual way; choose New Project ... from the Visual Studio start page or from the File menu.
Navigate the available project types and select"WPF Application" and then provide a suitable name for the project and click OK.
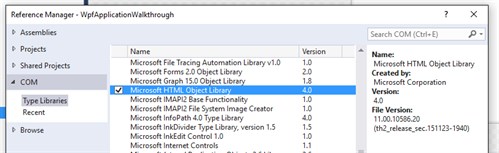
2. Add required references
The application will be accessing the Internet Explorer Web Browser Control directly as well as via the WPF wrapper control so a reference to the Microsoft HTML Object library is required:
References to the MeadCo Security Manager (for licensing) and MeadCo ScriptX libraries are also required:
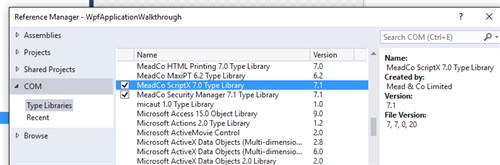
After selecting the required libraries click OK and then rebuild the app to ensure Intellisense is updated.
.NET References
We will be providing a list of the installed printers to the user so a reference to the System.Drawing assembly must also be addedd
3. Create the application UI
In this walkthrough we will use a simple UI:
- A web browser that will show a single page - we won't add any UI for navigation
- A drop down listing the available printers for the user to choose from
- Buttons for print and preview
<Grid>
   <Grid.RowDefinitions>
      <RowDefinition Height="*"></RowDefinition>
      <RowDefinition Height="Auto"></RowDefinition>
   </Grid.RowDefinitions>
   <StackPanel Grid.Row="1" Orientation="Horizontal">
      <ComboBox x:Name="CmbPrinters" Width="300" Margin="10"
         ItemsSource="{x:Static Printing:PrinterSettings.InstalledPrinters}"/>
      <Button x:Name="BtnPrint" Content="Print" Margin="10" Padding="10,2" />
      <Button x:Name="BtnPreview" Content="Preview" Margin="10" Padding="10,2"/>
   </StackPanel>
   <WebBrowser x:Name="Browser" HorizontalAlignment="Left" Margin="10,10,10,0"
      Grid.Row="0"/>
</Grid>
When the main window is loaded we will load the html document to be printed into the web browser:
<Window ...
   Loaded="MainWindow_OnLoaded"
>
private void MainWindow_OnLoaded(object sender, RoutedEventArgs e)
{
   // the page to print -- this page use a media print stylesheet
   Browser.Navigate("http://www.meadroid.com");
}
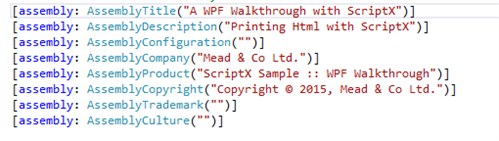
4. Apply the license
AssemblyInfo
To use the license the assembly properties must be updated to match.
Edit AssemblyInfo.cs and change the values of AssemblyProduct, AssemblyCompany and AssemblyCopyright to match the title and company name you supplied us for the license. In this example, the product name supplied was "ScriptX Sample :: WPF Walkthrough" and the company name was "Mead & Co Ltd."
App.config
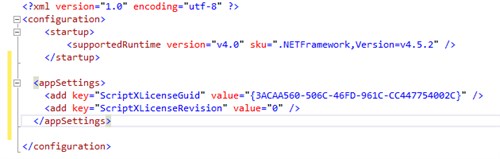
The license file will be supplied with a unique identifier and its revision number. For convenience the details of the license are added to app.config:
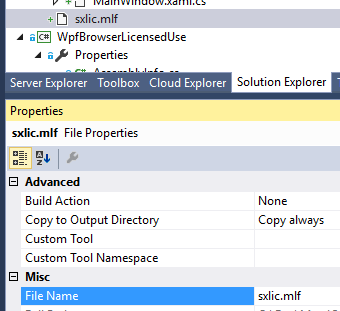
The license file (sxlic.mlf)
When the application is run the license file must be available with its location passed to Security Manager. The location can be anywhere that supports download - for example a website or, for this walkthrough, included in the same folder as the application. (It is recommended that the license file is kept external to the application so that it can be updated easily).
The license file supplied by MeadCo is added to the project and its properties updated to copy the file to the output directory:
Apply the license at runtime
The application is then licensed at runtime by using MeadCo Security Manager to apply the license (note: a reference to System.Configuration must be added to the project):
// License this application for use of ScriptX Advanced features.
// *NOTE* When debugging, must *not* Enable the Visual Studio Hosting Process
// (Project properties -> Debug page)
private void ApplyScriptXLicense()
{
   var secMgr = new SecMgr.SecMgr();
   string licenseUrl = AppDomain.CurrentDomain.BaseDirectory + "sxlic.mlf";

   try
   {
      secMgr.Apply(licenseUrl,
         ConfigurationManager.AppSettings["ScriptXLicenseGuid"],
         Int32.Parse(ConfigurationManager.AppSettings["ScriptXLicenseRevision"]));
   }
   catch (Exception e)
   {
      MessageBox.Show(string.Format("Failed to license this application: {0}",
         e.Message), this.Title);
   }
}
This function can be called as part of handling the MainWindow loaded event:
private void MainWindow_OnLoaded(object sender, RoutedEventArgs e)
{
   // the page to print -- this page use a media print stylesheet
   Browser.Navigate("http://www.meadroid.com");
   ApplyScriptXLicense();
}
5. Completing the UI
The UI in this walk-through is very minimal, we'll add the minimum necessary:
Current printer
We provide a list of the available printers (filled by a binding definition in the XAML markup) but we must also set the current printer. We add a reference to System.Printing and then add the following code to MainWindow_OnLoaded:
// select the default printer ...
var defaultPrinter = new LocalPrintServer().DefaultPrintQueue;
if (defaultPrinter != null)
{
   CmbPrinters.SelectedValue = defaultPrinter.FullName;
}
Print and Preview buttons
For the print and preview buttons we implement click event handlers that call a PrintOrPreview functrion with the required print operation:
// availableprint operations ..
private enum PrintOperation
{
   Print,
   Preview
}

private void BtnPrint_OnClick(object sender, RoutedEventArgs e)
{
   PrintDocument(PrintOperation.Print);
}

private void BtnPreview_OnClick(object sender, RoutedEventArgs e)
{
   PrintDocument(PrintOperation.Preview);
}

// Print or preview the document displayed in the web browser
private void PrintDocument(PrintOperation operation)
{
   ...
}
5. Implement Print/Preview
To implement the actual printing/preview takes three steps:
- Obtain the ScriptX Factory and hence the printer object
- Select the printer to use and configure the printer and soft settings such as headers/footers.
- Perform the print/preview
Obtain the ScriptX Factory
The ScriptX Factory object provides a number of utility functions as well as being the factory for a ScriptX printing object which is correctly initialised for the context of its use. In this case, we are looking to use ScriptX printing with the web browser. The simplest way to manage this is to use a ScriptX Factory that is already present on the document:
// obtain the html DOM
var document = (IHTMLDocument3) Browser.Document;

// the 'de-facto' id of the ScriptX Factory object is 'factory'
var factoryElement = (IHTMLObjectElement) document.getElementById("factory");
Or, if there isnt one, inject one into the document.
if (factoryElement == null)
{
   // the html to insert to put the ScriptX factory on the document.
   const string factoryObjectHtml = "<object id=\"factory\" style=\"display:none\""+
      " classid=\"clsid:1663ed61-23eb-11d2-b92f-008048fdd814\"></object>";

   ((IHTMLDocument2) Browser.Document).body.insertAdjacentHTML("beforeEnd",
         factoryObjectHtml);

   // obtain the inserted element
   factoryElement = (IHTMLObjectElement) document.getElementById("factory");
}
Now we have the factory, we can obtain the printer object.
ScriptX.Factory factory = factoryElement.@object;
if (factory != null)
{
   ScriptX.printing htmlPrinter = factory.printing;
   ...
}
This object provides access to to html printing features (such as headers and footers) and features of the printer, such as the paticular printer to use and the paper size.
We wrap obtaining the factory and the 'html' printer object into a property:
/// <summary>
/// Returns the ScriptX 'Printer' object initialised to
/// print/preview with the content of the web browser control
/// </summary>
private ScriptX.printing HtmlPrinter
{
    get
    {
        // locate any current ScriptX factory in the displayed document
        // and if none, create one
        var document = (IHTMLDocument3) Browser.Document;

        // the 'de-facto' id of the object is 'factory'
        var factoryElement = (IHTMLObjectElement) document.getElementById("factory");

        // does the factory object exist?
        if (factoryElement == null)
        {
        // the html to insert to put the ScriptX factory on the document.
        const string factoryObjectHtml = "<object id=\"factory\" style=\"display:none\""+
               " classid=\"clsid:1663ed61-23eb-11d2-b92f-008048fdd814\"></object>";

            // If not then create it.
            ((IHTMLDocument2) Browser.Document).body.insertAdjacentHTML("beforeEnd",
                factoryObjectHtml);

            factoryElement = (IHTMLObjectElement) document.getElementById("factory");
        }

        if (factoryElement != null)
        {
            // an object 'factory' exists, but is the object loaded
            // (it may not be installed)?
            ScriptX.Factory factory = factoryElement.@object;
            if (factory != null)
            {
                // we have a factory, get printing object
                // (this is an expensive call as a new COM
                // object is created).
                return factory.printing;

            }
        }

        return null;
    }
}
Select the printer and set print paramaters
Now we have a ScriptX printer object we can set the printer to be used as selected by the user and then set any of the basic or advanced properties that configure the printer or the print such as headers, footers or margin.
printer.printer = CmbPrinters.SelectedValue.ToString();
printer.paperSize = "A4";

printer.header = this.Title;
printer.footer = "&D&b&b&P of &p";

printer.SetMarginMeasure(2); // set units to inches
printer.leftMargin = 1.5f;
printer.topMargin = 1;
printer.rightMargin = 1;
printer.bottomMargin = 1;
Print/preview
To print or preview is simple, call Print() or Preview():
switch (operation)
{
    case PrintOperation.Print:
        // licensed, so no prompt will always be objeyed.
        printer.Print(false);
        break;

    case PrintOperation.Preview:
        printer.Preview();
        break;
}
Conclusion
This walk through has illustrated using advanced features of ScriptX HTML Printing to provide full control over printing an HTML document.
The code for this walk through is available on Github.
::> Guide to Security Manager