ASP.NET Web Forms Sites and Apps (C# or VB)
To work with a ASP.NET Web sites or Web applications developed in c# or VB.NET with the ASP.NET View Engine, use the MeadCo ScriptX ASP.NET Web Forms server controls package.
Illustration
In this illustration we will use use Visual Studio 2013 Express to create a new web site and will then add the ability to print the home page of the site in landscape orientation to the default printer with site specific headers and footers.
In doing this, the server control will take care of emitting HTML content that will ensure the ScriptX add-on is installed on the client PC and if not deliver the current version with appropriate prompts to help the user. The server control will also create all the required javascript to control the printing process.
This illustration does not use any licensed features of ScriptX. We assume that you are familiar with writing web applications with Visual Studio/Visual Studio Express.
Note that while we will be using Visual Studio Express (Update 3), Visual Studio 2010, 2012 and 2015 are supported.
Watch a video of the walk-through ...
or work through at your own pace:
1. Create the web site
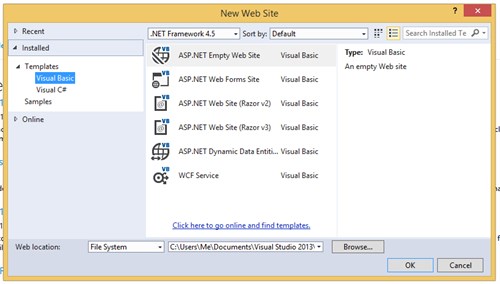
Create the web site in the usual way; choose New Web Site from the Visual Studio Express 2013 start page or from the File menu.

Both Visual Basic and Visual C# are supported.
Select 'ASP.NET Web Forms Site', select File System for the location and then browse to a folder and give the site a suitable name such as 'ScriptXDemo'. Finally click OK.
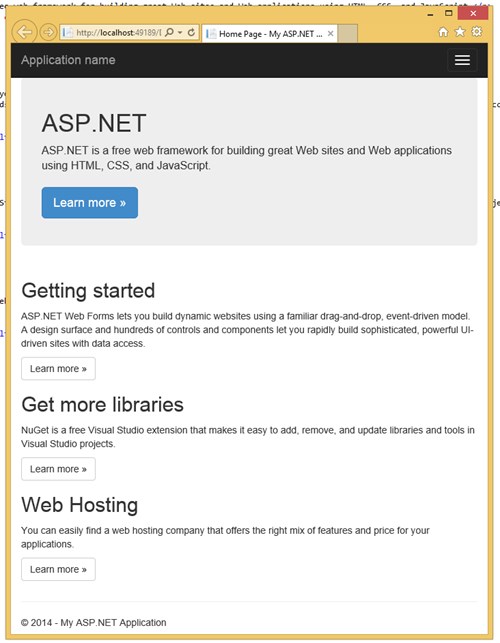
Run the site in Internet Explorer:

and the default home page for the site will be displayed:

At this point if we wanted the page printed with a specific header in landscape orientation the user would have to:
- Open the page setup dialog from the File or Gear menus and choose landscape and enter the required header
- Chose "Print .." from an available menu
With ScriptX, we can provide an on page button that will start the print and we can also specify headers and footers for the print and the orientation.
2. Add the MeadCo ScriptX ASP.NET Server Controls package
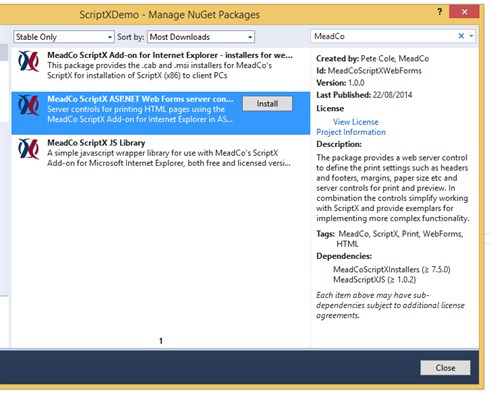
The Server Controls package is available on Nuget, so use Nuget Package Manager and search for 'MeadCo'. The results will show all MeadCo's Nuget packages, select 'MeadCo ScriptX ASP.NET Web Forms server Controls' and wait while the package is installed.

The package is dependent on the installers package and MeadCo ScriptX JS Library so can take a while to download and install.
The installation will update web.config to include the namespace for the server controls on every page in your site, install the server control implementation dll and finally the installers for installing the ScriptX Add-on to Client PCs - in otherwords, everything you need.
3. Add printing to a page
All the functionality required is provided by custom tags in the MeadCoScriptX namespace:
- ClientPrinting provides initialising printing and setting the parameters such as headers and footers.
- PrintPreviewButton provides a button that when clicked will open the print preview window
- PrintButton will print the document to the current printer.
To add printing, we use the server control 'MeadCoScriptX:ClientPrinting'. This server control will add code to the page to ensure the ScriptX add-on is available on the client PC and also to specifiy the settings for the print for example headers, footers and orientation. The control does not emit any visible content so can be placed anywhere suitable on the page.
For this example, we will place it at the top of the 'MainContent' section.
Type <Mead and intellisense will show the controls available:

Select ClientPrinting then press <space> and select the ClientValidation attribute and give it the value 'redirect'. Dont forget to set the runat attribute to "server".
Now close the server tag by typing >, press enter to create a new line and type < to show the tags available in the control. Select PrintSettings:

Now complete the attributes header and footer. Close the tag and use intellisence to find the next child tag PageSetup and set attribute orientation to landscape. You should have the following code on your page:
<MeadCoScriptX:ClientPrinting ClientValidate="redirect"  runat="server">
      <PrintSettings footer="ScriptX Demonstration Page: &p" header="Date: &D">
          <PageSetup Orientation="landscape"></PageSetup>
      </PrintSettings>
</MeadCoScriptX:ClientPrint>
We now have printing available for the page and have described the parameters for the print it just remains to add some buttons to print and preview the page.
The MeadCoScriptX namespace contains two tags for buttons. These provide the same styling capabilities as HTML buttons from the standard toolbox.
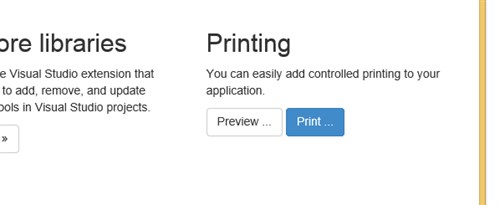
Change the last column of the page content to be as shown below:
<div class="col-md-4">
   <h2>Printing</h2>
   <p>
      You can easily add controlled printing to your application
           with MeadCo's ScriptX.
   </p>
   <p>
      <MeadCoScriptX:PrintPreviewButton Text="Preview ..."
               runat="server"
               CssClass="btn btn-default" />
      <MeadCoScriptX:PrintButton Text="Print ..."
               runat="server"
               CssClass="btn btn-primary" />
   </p>
</div>
4. Now run your web site.
Run your web site in Internet Explorer as before:

If ScriptX is not yet installed you will be redirected to a page which will help you to install the Add-on.
Once installed, return to the home page of your site and try the Preview ... and Print .. buttons.

Notice when you preview or print that your defined headers and footers are used and the page orientation will be landscape.
Close the web site and re-open Internet Explorer from your task bar or open a new tab. Preview the page -- the header, footer and orientation are your defaults; ScriptX has not interfered with them.
All these features for free.
With a ScriptX publishing license you have greater control - for example you can specifiy the printer, paper size, paper source or print to label printers or print PDF documents.
Ta dah!
For more information please see the Client side NuGet packages reference.